> ## Documentation Index
> Fetch the complete documentation index at: https://docs.coplay.dev/llms.txt
> Use this file to discover all available pages before exploring further.
# Generate Blender Assets
> Learn how to use Coplay to create 3D assets using Blender and import them into Unity
This guide will walk you through how to connect Coplay to Blender using the Model Context Protocol (MCP),
create 3D assets directly from natural language prompts, and seamlessly import them into your Unity projects.
Before starting this tutorial, ensure you have:
* Unity installed with Coplay extension
* Python and pip installed on your system
* uv package manager installed (we'll install this if needed)
* Basic familiarity with Unity and 3D modeling concepts
1. **Download Blender**: Visit [blender.org](https://www.blender.org/download/) and download the latest version for your operating system
2. **Install Blender**: Follow the standard installation process for your platform
3. **Launch Blender**: Start Blender to ensure it's working correctly
Make sure you're using Blender 3.0 or later for compatibility with the MCP server.
The Blender MCP server requires the `uv` package manager for Python dependency management.
**On macOS (using Homebrew):**
```bash theme={null}
brew install uv
```
**On other platforms:**
```bash theme={null}
curl -LsSf https://astral.sh/uv/install.sh | sh
```
**Verify installation:**
```bash theme={null}
uv --version
```
The Blender MCP server enables communication between Coplay and Blender through the Model Context Protocol.
1. **Install using uv:**
```bash theme={null}
uvx blender-mcp
```
2. **Verify the installation:**
```bash theme={null}
uvx blender-mcp --help
```
The Blender MCP server is based on [ahujasid/blender-mcp](https://github.com/ahujasid/blender-mcp) repository,
which provides a bridge between AI language models and Blender's Python API.
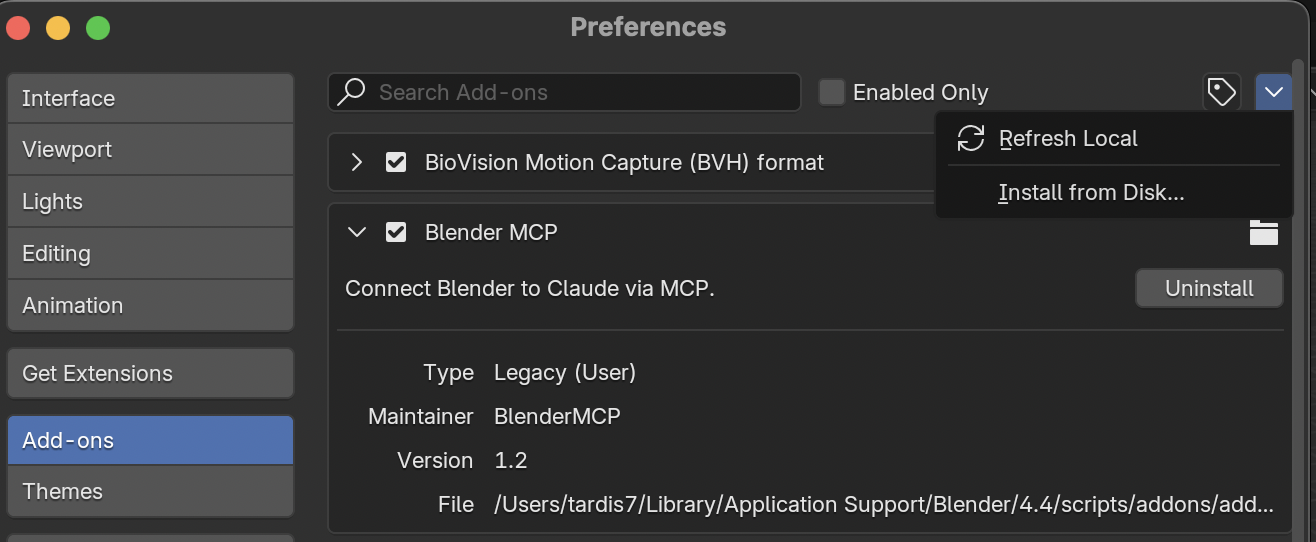
Start Blender and navigate to Edit > Preferences > Add-ons. Select "Install from Disk ..."
and choose the `addon.py` file from the `blender-mcp` directory you just installed.
Enable the add-on by checking the box next to it.
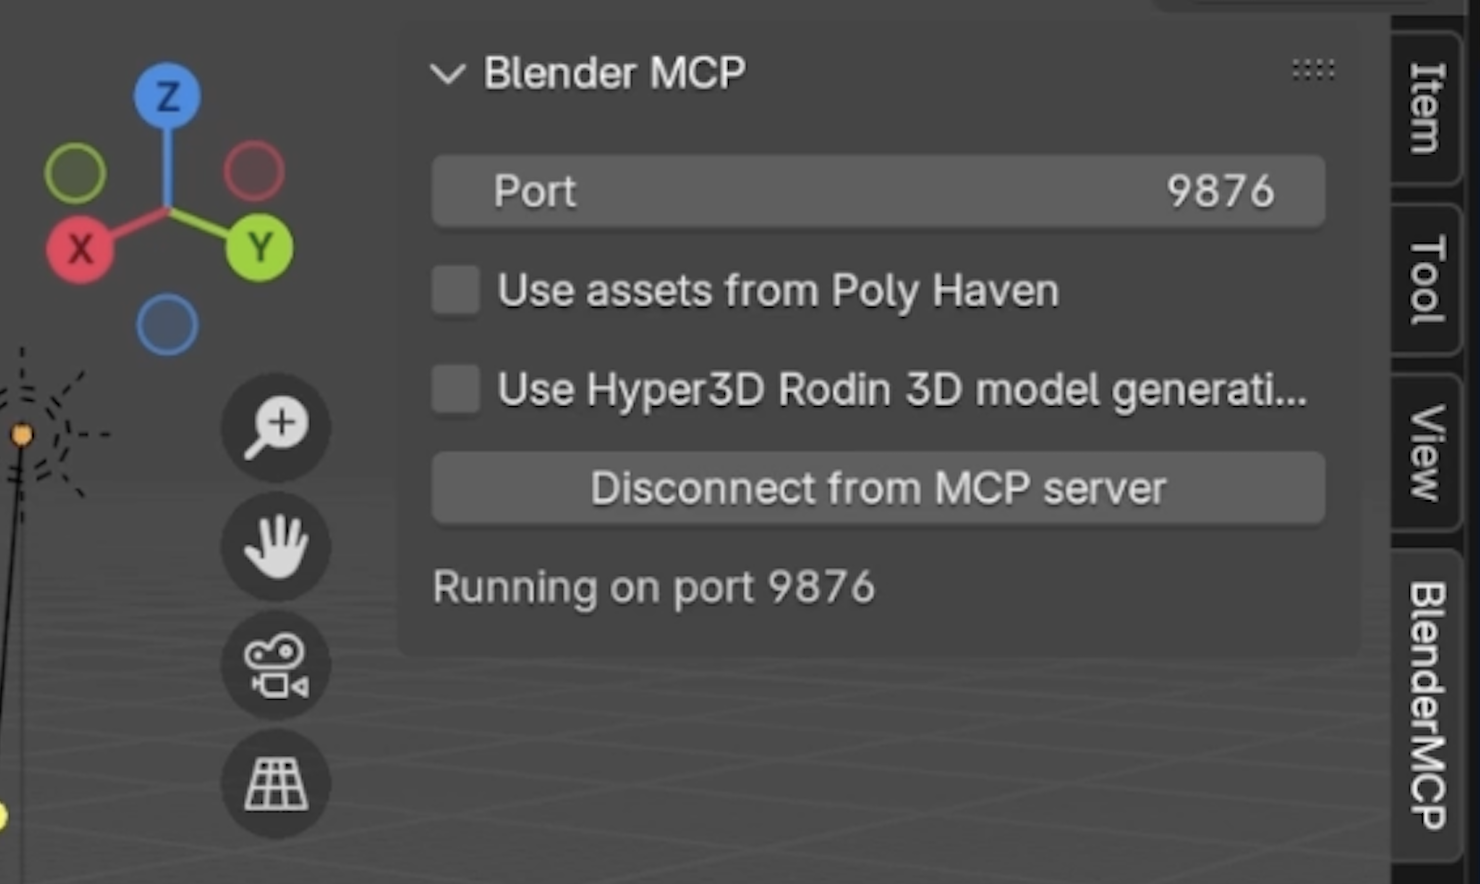
 By default, the MCP server will listen on port 9876.
If you need to change this, you should also modify the `addon.py` configuration file.
Once configured, you should see the Blender MCP server connection active in Coplay.
By default, the MCP server will listen on port 9876.
If you need to change this, you should also modify the `addon.py` configuration file.
Once configured, you should see the Blender MCP server connection active in Coplay.
 The MCP server provides several tools for Blender automation:
* **Scene creation and manipulation**
* **Object modeling and sculpting**
* **Material and texture application**
* **Lighting and camera setup**
* **Asset export functionality**
Now we need to configure Coplay to connect to the Blender MCP server.
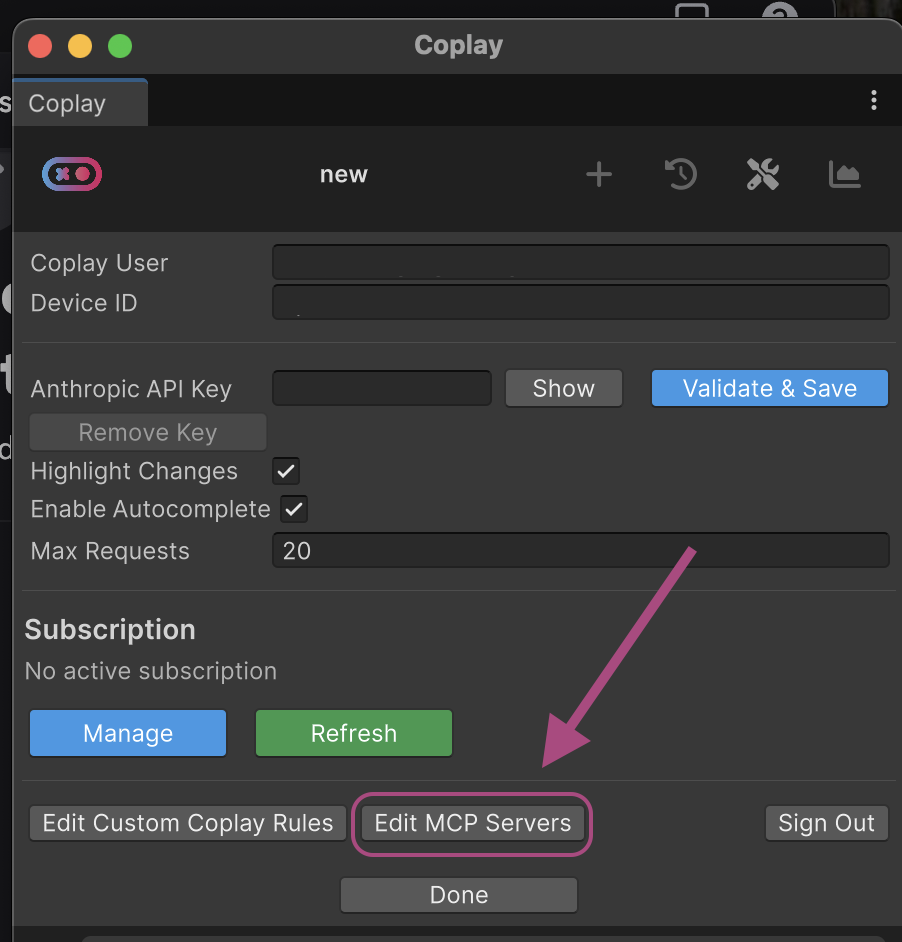
1. **Open Coplay Settings**: In Unity, go to **Coplay > Toggle Window** or press `⌘ + G` (Mac) / `Ctrl + G` (PC)
2. **Access MCP Configuration**: Click the "Edit MCP Servers" button in the Coplay settings panel
The MCP server provides several tools for Blender automation:
* **Scene creation and manipulation**
* **Object modeling and sculpting**
* **Material and texture application**
* **Lighting and camera setup**
* **Asset export functionality**
Now we need to configure Coplay to connect to the Blender MCP server.
1. **Open Coplay Settings**: In Unity, go to **Coplay > Toggle Window** or press `⌘ + G` (Mac) / `Ctrl + G` (PC)
2. **Access MCP Configuration**: Click the "Edit MCP Servers" button in the Coplay settings panel
 3. **Add Blender MCP Server**: Add the following configuration to your MCP servers:
```json theme={null}
{
"mcpServers": {
"blender-mcp": {
"command": "uvx",
"args": [
"blender-mcp"
],
"env": {
"PATH": "/opt/homebrew/bin:/usr/local/bin:/usr/bin:/bin:/usr/sbin:/sbin"
}
}
}
}
```
Update the PATH environment variable to match where `uv` is installed on your system. The example above shows the typical path for Homebrew installations on macOS.
4. **Save and Restart**: Save the configuration and restart Coplay to establish the MCP connection
Now for the exciting part! Let's create a beautiful 3D scene using natural language.
**Use this prompt in Coplay:**
```
Using Blender via MCP, create a low-poly cherry blossom garden.
The scene should include:
- Several cherry blossom trees with pink flowers
- A garden path cuttng through the trees
- Some decorative stones areas
- Low-poly aesthetic for game-ready assets
Please organize the scene with proper materials and ensure all objects are named appropriately for Unity import.
```
Coplay will interpret this prompt and use the Blender MCP server to automatically create geometry, apply materials, set up lighting, and organize the scene structure.
As Coplay works with Blender through MCP, Coplay will provide status updates as it creates objects. Watch as Blender automatically creates your scene
**What Coplay will do:**
* Create base meshes for trees, paths, and landscape elements
* Apply appropriate materials and textures
* Set up lighting to enhance the garden atmosphere
* Organize objects into logical collections
* Prepare the scene for export
Once the initial creation is complete:
1. **Open Blender**: Switch to the Blender window to see your generated scene
2. **Review the Assets**: Examine the created geometry, materials, and lighting
3. **Make Adjustments**: Use Coplay to request modifications if needed
**Example refinement prompts:**
```
"Add more detail to the cherry blossom petals"
"Make the garden path more curved and organic"
"Adjust the lighting to be more golden hour"
"Add small decorative lanterns along the path"
```
You can iterate on your scene by providing additional prompts to Coplay, which will continue to modify the Blender scene through MCP.
Now let's bring your Blender creation into Unity using Coplay.
**Use this prompt:**
```
Import the blender scene into Unity
```
Coplay will handle the entire import process, including:
* File format conversion
* Material translation
* Texture mapping
* Scene hierarchy setup
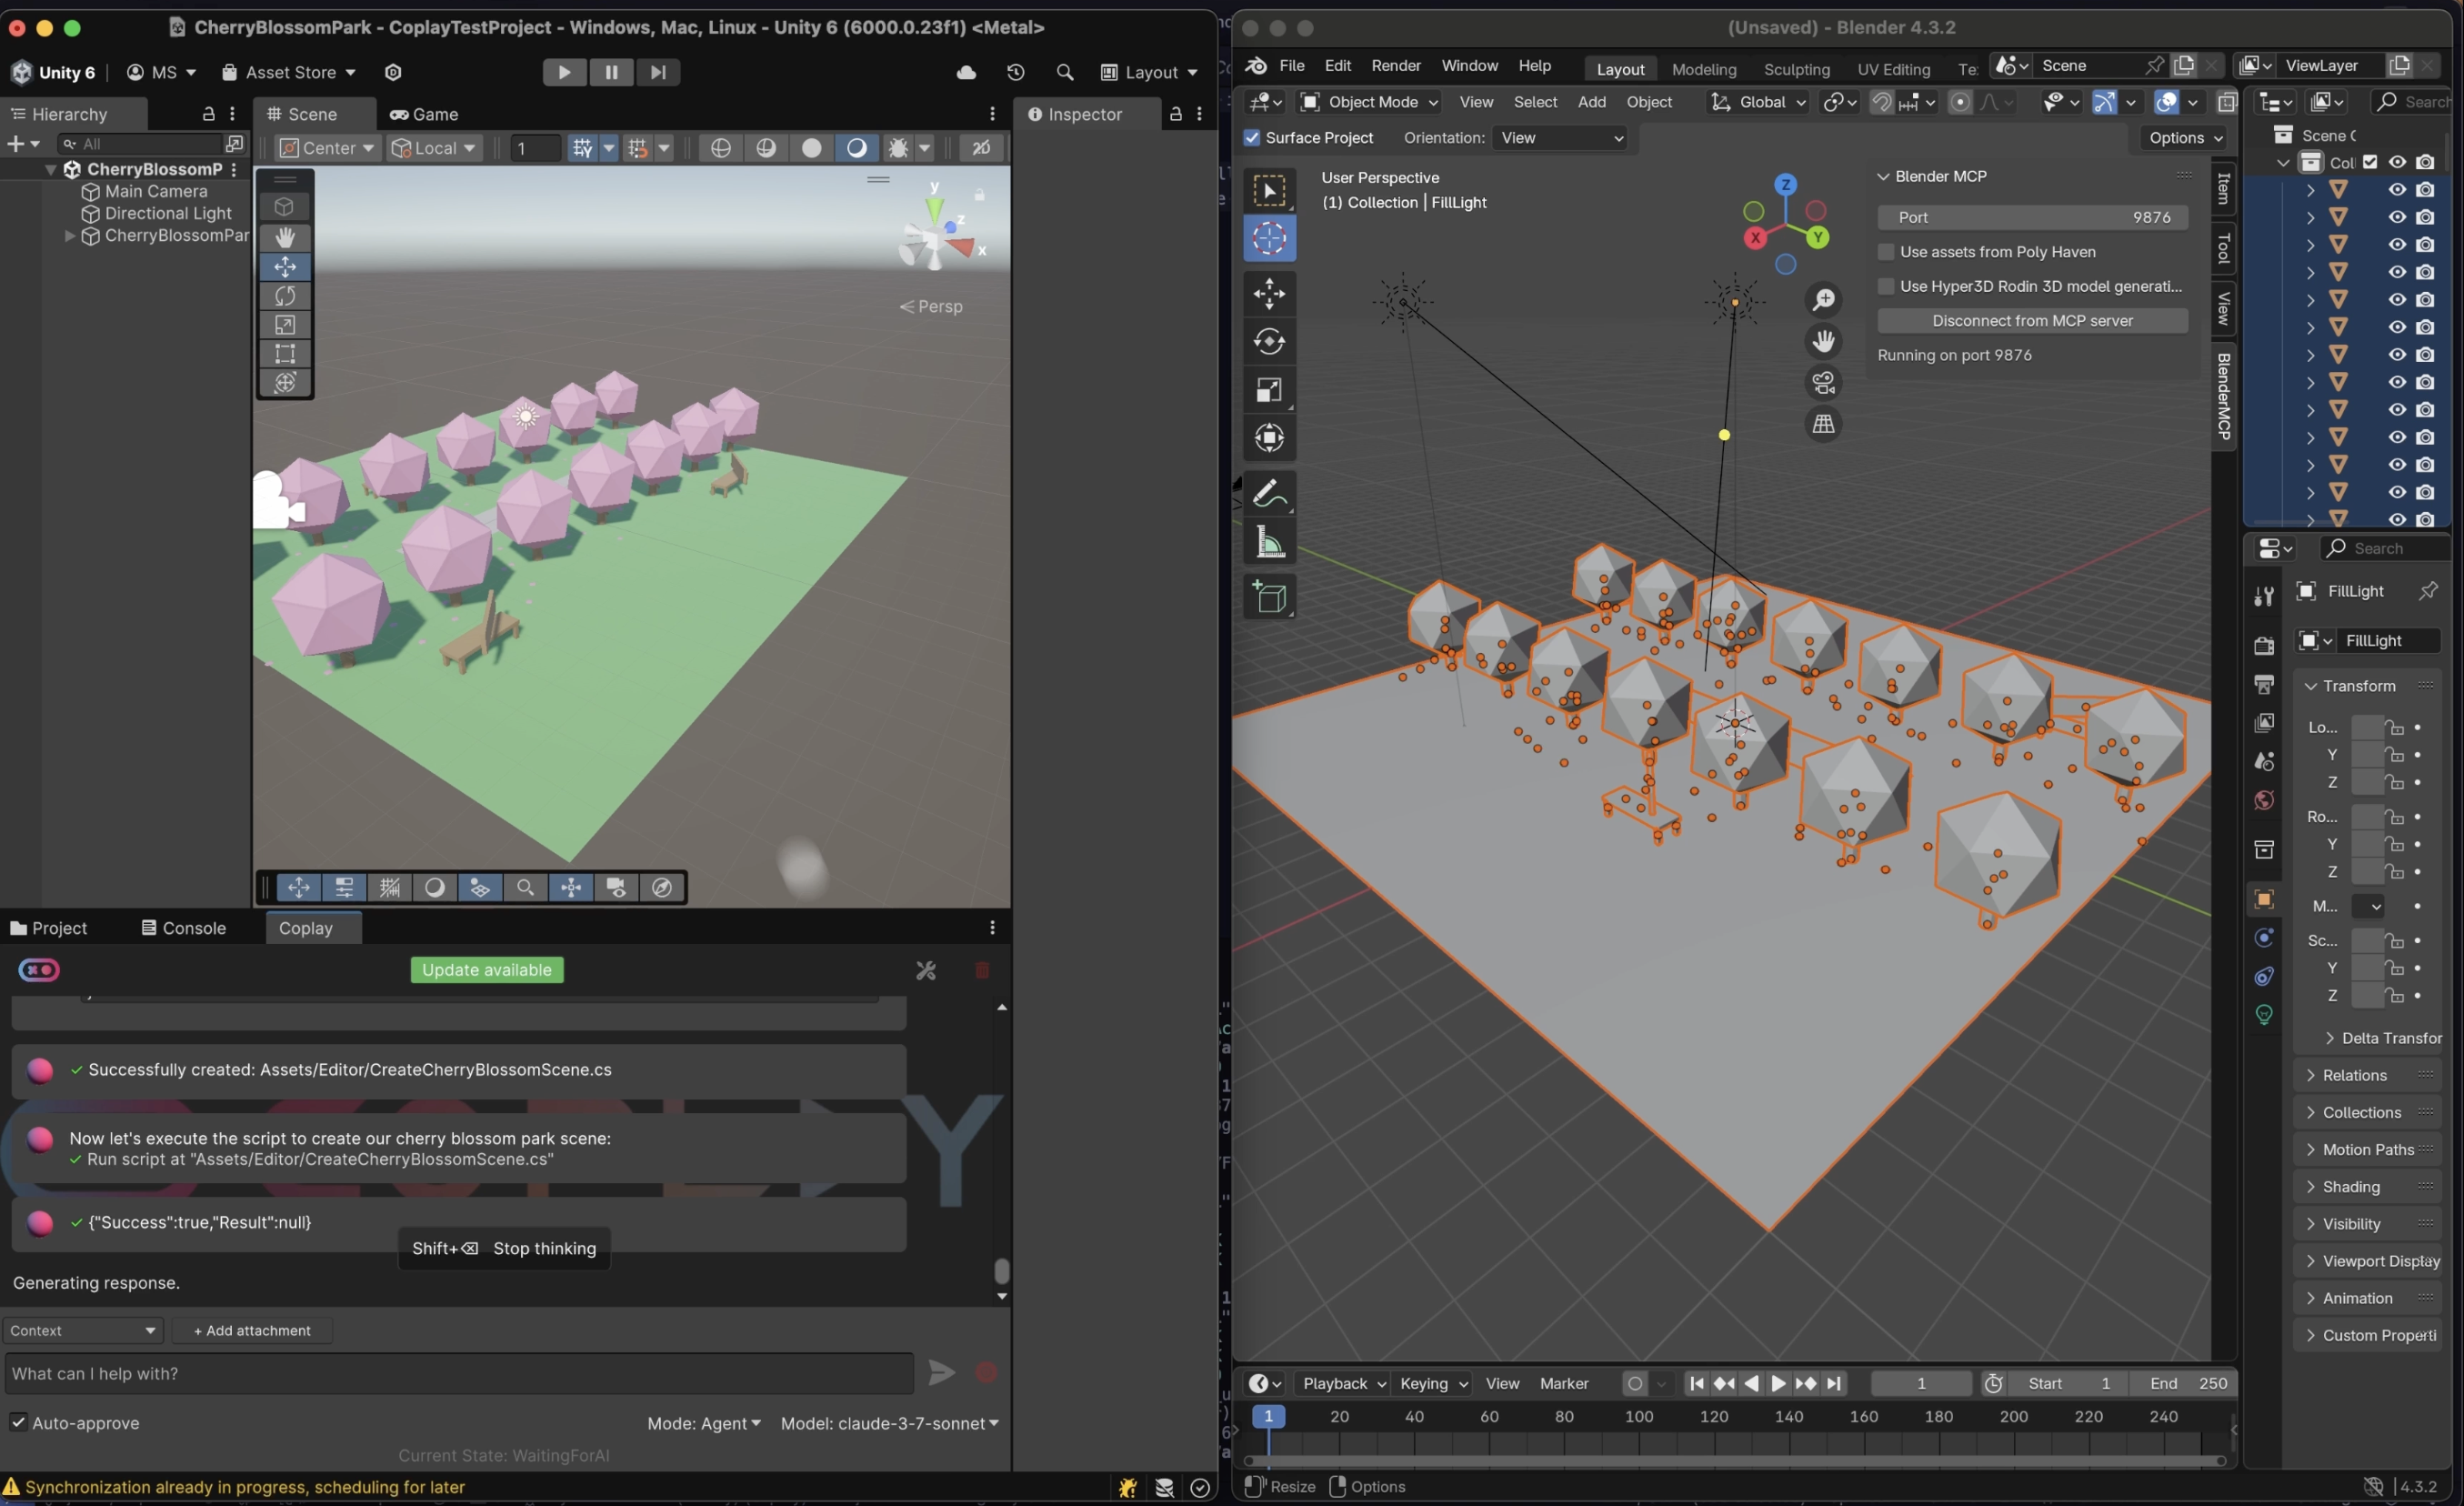
You should now have a beautiful cherry blossom garden in both Blender and Unity!
3. **Add Blender MCP Server**: Add the following configuration to your MCP servers:
```json theme={null}
{
"mcpServers": {
"blender-mcp": {
"command": "uvx",
"args": [
"blender-mcp"
],
"env": {
"PATH": "/opt/homebrew/bin:/usr/local/bin:/usr/bin:/bin:/usr/sbin:/sbin"
}
}
}
}
```
Update the PATH environment variable to match where `uv` is installed on your system. The example above shows the typical path for Homebrew installations on macOS.
4. **Save and Restart**: Save the configuration and restart Coplay to establish the MCP connection
Now for the exciting part! Let's create a beautiful 3D scene using natural language.
**Use this prompt in Coplay:**
```
Using Blender via MCP, create a low-poly cherry blossom garden.
The scene should include:
- Several cherry blossom trees with pink flowers
- A garden path cuttng through the trees
- Some decorative stones areas
- Low-poly aesthetic for game-ready assets
Please organize the scene with proper materials and ensure all objects are named appropriately for Unity import.
```
Coplay will interpret this prompt and use the Blender MCP server to automatically create geometry, apply materials, set up lighting, and organize the scene structure.
As Coplay works with Blender through MCP, Coplay will provide status updates as it creates objects. Watch as Blender automatically creates your scene
**What Coplay will do:**
* Create base meshes for trees, paths, and landscape elements
* Apply appropriate materials and textures
* Set up lighting to enhance the garden atmosphere
* Organize objects into logical collections
* Prepare the scene for export
Once the initial creation is complete:
1. **Open Blender**: Switch to the Blender window to see your generated scene
2. **Review the Assets**: Examine the created geometry, materials, and lighting
3. **Make Adjustments**: Use Coplay to request modifications if needed
**Example refinement prompts:**
```
"Add more detail to the cherry blossom petals"
"Make the garden path more curved and organic"
"Adjust the lighting to be more golden hour"
"Add small decorative lanterns along the path"
```
You can iterate on your scene by providing additional prompts to Coplay, which will continue to modify the Blender scene through MCP.
Now let's bring your Blender creation into Unity using Coplay.
**Use this prompt:**
```
Import the blender scene into Unity
```
Coplay will handle the entire import process, including:
* File format conversion
* Material translation
* Texture mapping
* Scene hierarchy setup
You should now have a beautiful cherry blossom garden in both Blender and Unity!
 Take your 3D asset creation to the next level with these advanced techniques:
### Using Poly Haven Assets
Enhance your scenes with high-quality, free assets from Poly Haven:
```
"Using Blender MCP, download and integrate HDRIs from Poly Haven for realistic lighting in my cherry blossom garden. Add some rock textures and natural ground materials."
```
### Procedural Generation with Rodin
Generate unique 3D models using Rodin AI:
```
"Using Rodin via MCP, generate a traditional Japanese stone lantern model and integrate it into my Blender cherry blossom scene. Make it low-poly and game-ready."
```
### Dynamic Asset Variations
Create multiple variations of your assets:
```
"Create 5 different variations of cherry blossom trees with varying heights, branch patterns, and flower density. Ensure each has a unique silhouette for visual variety."
```
### Seasonal Adaptations
Transform your scene for different seasons:
```
"Adapt my cherry blossom garden for autumn - change the tree materials to orange and red leaves, add fallen leaves on the ground, and adjust lighting for a warmer, more golden atmosphere."
```
To get the most out of Blender MCP integration:
**Optimization Tips:**
* Always specify "low-poly" or "game-ready" in your prompts for Unity projects
**Organization Tips:**
* Request proper naming conventions for easy identification
* Ask for logical collection organization in Blender
* Specify material naming that makes sense for your project
**Workflow Tips:**
* Start with simple scenes and gradually add complexity
* Use iterative prompts to refine specific elements
* Save your Blender files regularly during the creation process
**Troubleshooting:**
* If MCP connection fails, check your PATH environment variable
* Ensure Blender is closed when starting the MCP server
* Ensure the MCP server is running on the 9876 port
* Verify uv installation if you encounter Python-related errors
***
Congratulations! You have successfully created a stunning cherry blossom garden using Coplay and Blender MCP.
With this foundation, you can tackle any 3D modeling challenge by simply describing what you want to create.
**Share your creations with the [Coplay community on Discord](http://discord.com/invite/KmGfEr6d3v) and inspire others with your AI-generated 3D artwork!**
Take your 3D asset creation to the next level with these advanced techniques:
### Using Poly Haven Assets
Enhance your scenes with high-quality, free assets from Poly Haven:
```
"Using Blender MCP, download and integrate HDRIs from Poly Haven for realistic lighting in my cherry blossom garden. Add some rock textures and natural ground materials."
```
### Procedural Generation with Rodin
Generate unique 3D models using Rodin AI:
```
"Using Rodin via MCP, generate a traditional Japanese stone lantern model and integrate it into my Blender cherry blossom scene. Make it low-poly and game-ready."
```
### Dynamic Asset Variations
Create multiple variations of your assets:
```
"Create 5 different variations of cherry blossom trees with varying heights, branch patterns, and flower density. Ensure each has a unique silhouette for visual variety."
```
### Seasonal Adaptations
Transform your scene for different seasons:
```
"Adapt my cherry blossom garden for autumn - change the tree materials to orange and red leaves, add fallen leaves on the ground, and adjust lighting for a warmer, more golden atmosphere."
```
To get the most out of Blender MCP integration:
**Optimization Tips:**
* Always specify "low-poly" or "game-ready" in your prompts for Unity projects
**Organization Tips:**
* Request proper naming conventions for easy identification
* Ask for logical collection organization in Blender
* Specify material naming that makes sense for your project
**Workflow Tips:**
* Start with simple scenes and gradually add complexity
* Use iterative prompts to refine specific elements
* Save your Blender files regularly during the creation process
**Troubleshooting:**
* If MCP connection fails, check your PATH environment variable
* Ensure Blender is closed when starting the MCP server
* Ensure the MCP server is running on the 9876 port
* Verify uv installation if you encounter Python-related errors
***
Congratulations! You have successfully created a stunning cherry blossom garden using Coplay and Blender MCP.
With this foundation, you can tackle any 3D modeling challenge by simply describing what you want to create.
**Share your creations with the [Coplay community on Discord](http://discord.com/invite/KmGfEr6d3v) and inspire others with your AI-generated 3D artwork!**